


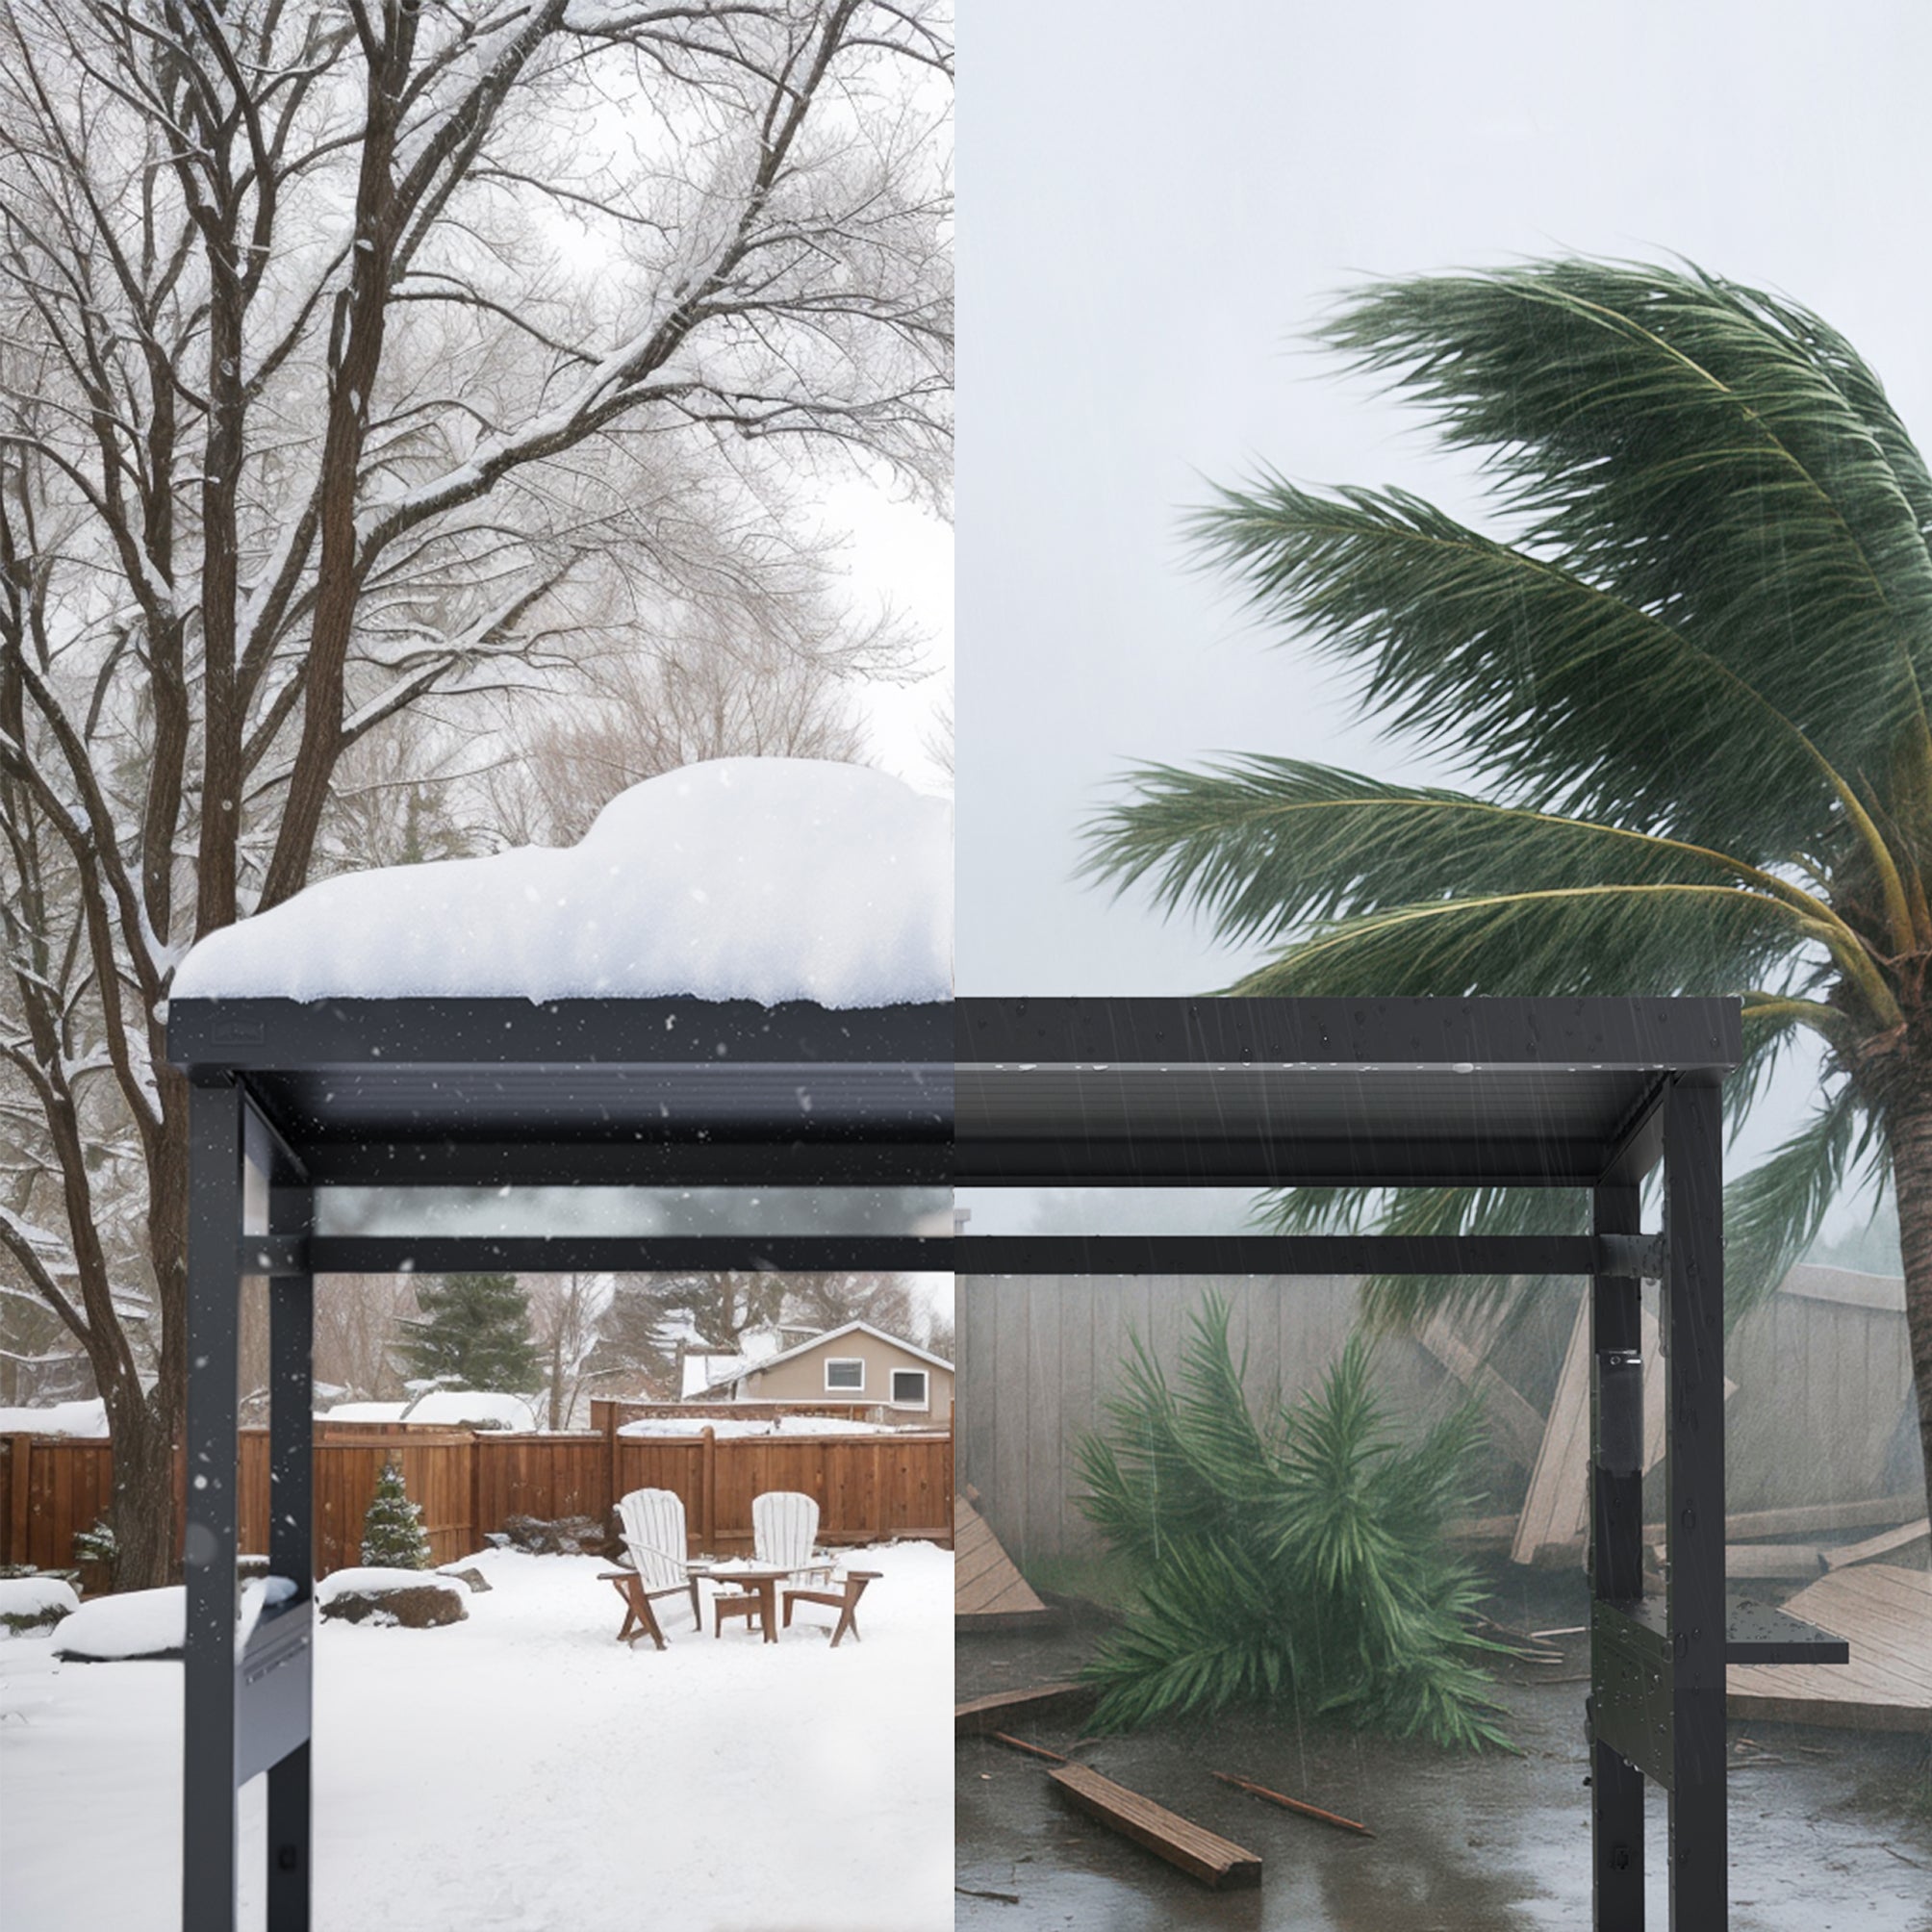
 85 mph Windproof
 Supports 20" of Snow
 All-Aluminum Construction
 Frame Coated in AkzoNobel Interpon®

LuxPatio Premium Installation Service Policy
1. What's Included
Our LuxCert Pro Installation Service ensures a worry-free setup by trained professionals. The service includes:
- On-site evaluation and foundation check
- Level and secure assembly
- Electrical system activation and testing (if applicable)
- Clean-up and relocation of all packaging to your designated area
Installation Time: Typically completed within 2–4 hours
Service Area: Available across the contiguous U.S. (For Hawaii/Alaska, please contact us for a quote)
| Note: Delivery and installation may be handled by separate teams and might occur on different days. Please make sure your site is level and clear of obstructions to avoid delays. |
2. Booking & Scheduling
- Confirmation: Our team will contact you within 3 business days to confirm your order and schedule a site check
- Lead Time: Usually 1–4 weeks from order date. Some areas may take 6–8 weeks during peak seasons or weather delays
- Weekend Appointments: Available in select areas (not guaranteed)
If we’re unable to serve your area, you’ll be notified and offered a refund
3. Cancellations & Rescheduling
- Standard notice: Must be made at least 72 hours in advance
- Late cancellation: $100 fee applies
- Same-day cancellation (<24 hours): Full service fee still applies
- Multiple reschedules: May result in losing your current place in line
-
Weather Delays: For safety, services may be rescheduled in case of:
- Heavy rain (>0.5"/hr)
- High winds (gusts >25 mph)
- Extreme temps (<40°F or >91°F)
- Final decisions are based on local hazard alerts.
4. Your Responsibilities Before Installation
Please make sure of the following:
- Clear access: At least a 5-foot path to the installation site
- Utility markings: Call 811 to mark underground lines
- Adult presence: Someone 18+ must be present during installation
- Level surface: Ensure your site is level and obstruction-free
- Compliance: Check that your pergola setup meets local codes, HOA rules, and bylaws
|
Note: Installation may be delayed, canceled, or incur extra fees if the site is unprepared or unsafe. |
5. Warranty & Damage Policy
- Craftsmanship Guarantee: 30-day warranty covering installation issues
- Insurance: All LuxCert technicians are fully insured
- Damage claims: Must be reported within 24 hours with documentation. Notify the team on-site if you notice any issues immediately.
6. Pricing & Payments
- Base Fee: Varies by model (covers standard installation)
-
Extras (if needed):
- Extended debris recycling: $150
- Anchoring service: Included (surface-dependent)
- Holiday installation: +$200
- Existing structure removal: Quoted case-by-case
- Remote area surcharge: Quoted in advance
|
Full payment is required when your installation is scheduled. Additional services are quoted and charged separately. |
Disclaimer
1. Site Preparation & Ground Conditions
The customer is responsible for ensuring the installation site meets all required conditions prior to service. This includes:
- A level surface with a slope of less than 3° or a maximum height difference of 2 cm per column
- A minimum load-bearing capacity of 1,500 psf
- (We recommend a 4" thick concrete pad per column for soft surfaces such as grass or soil)
- All underground utilities must be marked by contacting 811 before installation
Important Notes:
- Additional charges may apply for unstable ground, such as sand or mud
- If the installation site has incompatible conditions (e.g., steep slopes, soft/unstable surface) or the Customer Responsibilities are not met, the service may be canceled on-site.
In such cases, a minimum service fee of $200 will still apply.
2. Installation Process & Limitations
2.1 Material Handling
- Minor cosmetic marks (scratches under 10mm) may occur during normal installation and are not covered under warranty
- Any structural modifications (e.g., drilling or cutting) not performed by LuxCert technicians will void the product warranty
2.2 Weather & External Factors
- Installation may be rescheduled due to:
- Heavy rainfall exceeding 0.5"/hour
- Wind gusts over 25 mph
- Temperatures below 40°F or above 91°F
- Any precipitation during scheduled installation time
|
Damage caused by extreme weather after installation (e.g., wind ≥35 mph, hailstorms) is not covered by the 30-day Craftsmanship Guarantee. |
3. Electronic Systems & Technical Requirements
The client is responsible for providing:
- Power access installed by a licensed electrician
LuxPatio is not responsible for:
- Compatibility with third-party smart systems or accessories
- Connectivity or performance issues not caused directly by LuxCert technicians
4. Liability Limitations
4.1 Property Damage
- LuxPatio’s maximum liability for installation-related property damage is limited to the full installation fee paid or the actual reasonable loss, whichever is lower
- Damages exceeding this limit will be reviewed through our business liability insurance
- Landscaping repair or indirect/consequential damage is not covered
4.2 Personal Injury Prevention
To help prevent injury, clients must:
- Ensure children and pets remain clear of the installation area
- Provide safe and unobstructed access to standard power outlets (110–120V)
- Remove all debris, tools, or objects that could pose safety hazards during installation
5. Client Acknowledgments
By booking an installation with LuxPatio, you acknowledge and agree that:
- You have reviewed and accepted the LuxPatio Premium Installation Service Policy
- All general disputes will be handled via our Customer Service Escalation process, and legal disputes will be resolved through arbitration in the state of Texas
- LuxPatio is not responsible for issues related to local HOA, municipal codes, or bylaw compliance.
| Customers will be liable for any required modifications, dismantling, or relocation due to such issues. |
- LuxPatio is not liable for surface damage resulting from anchoring during installation. Surface cracking, chipping, or drilling damage may occur and is considered standard risk when anchoring is selected.


9AM to 5PM PST Mon-Fri
 Free Shipping within the US
 10-Year Warranty


 US Company
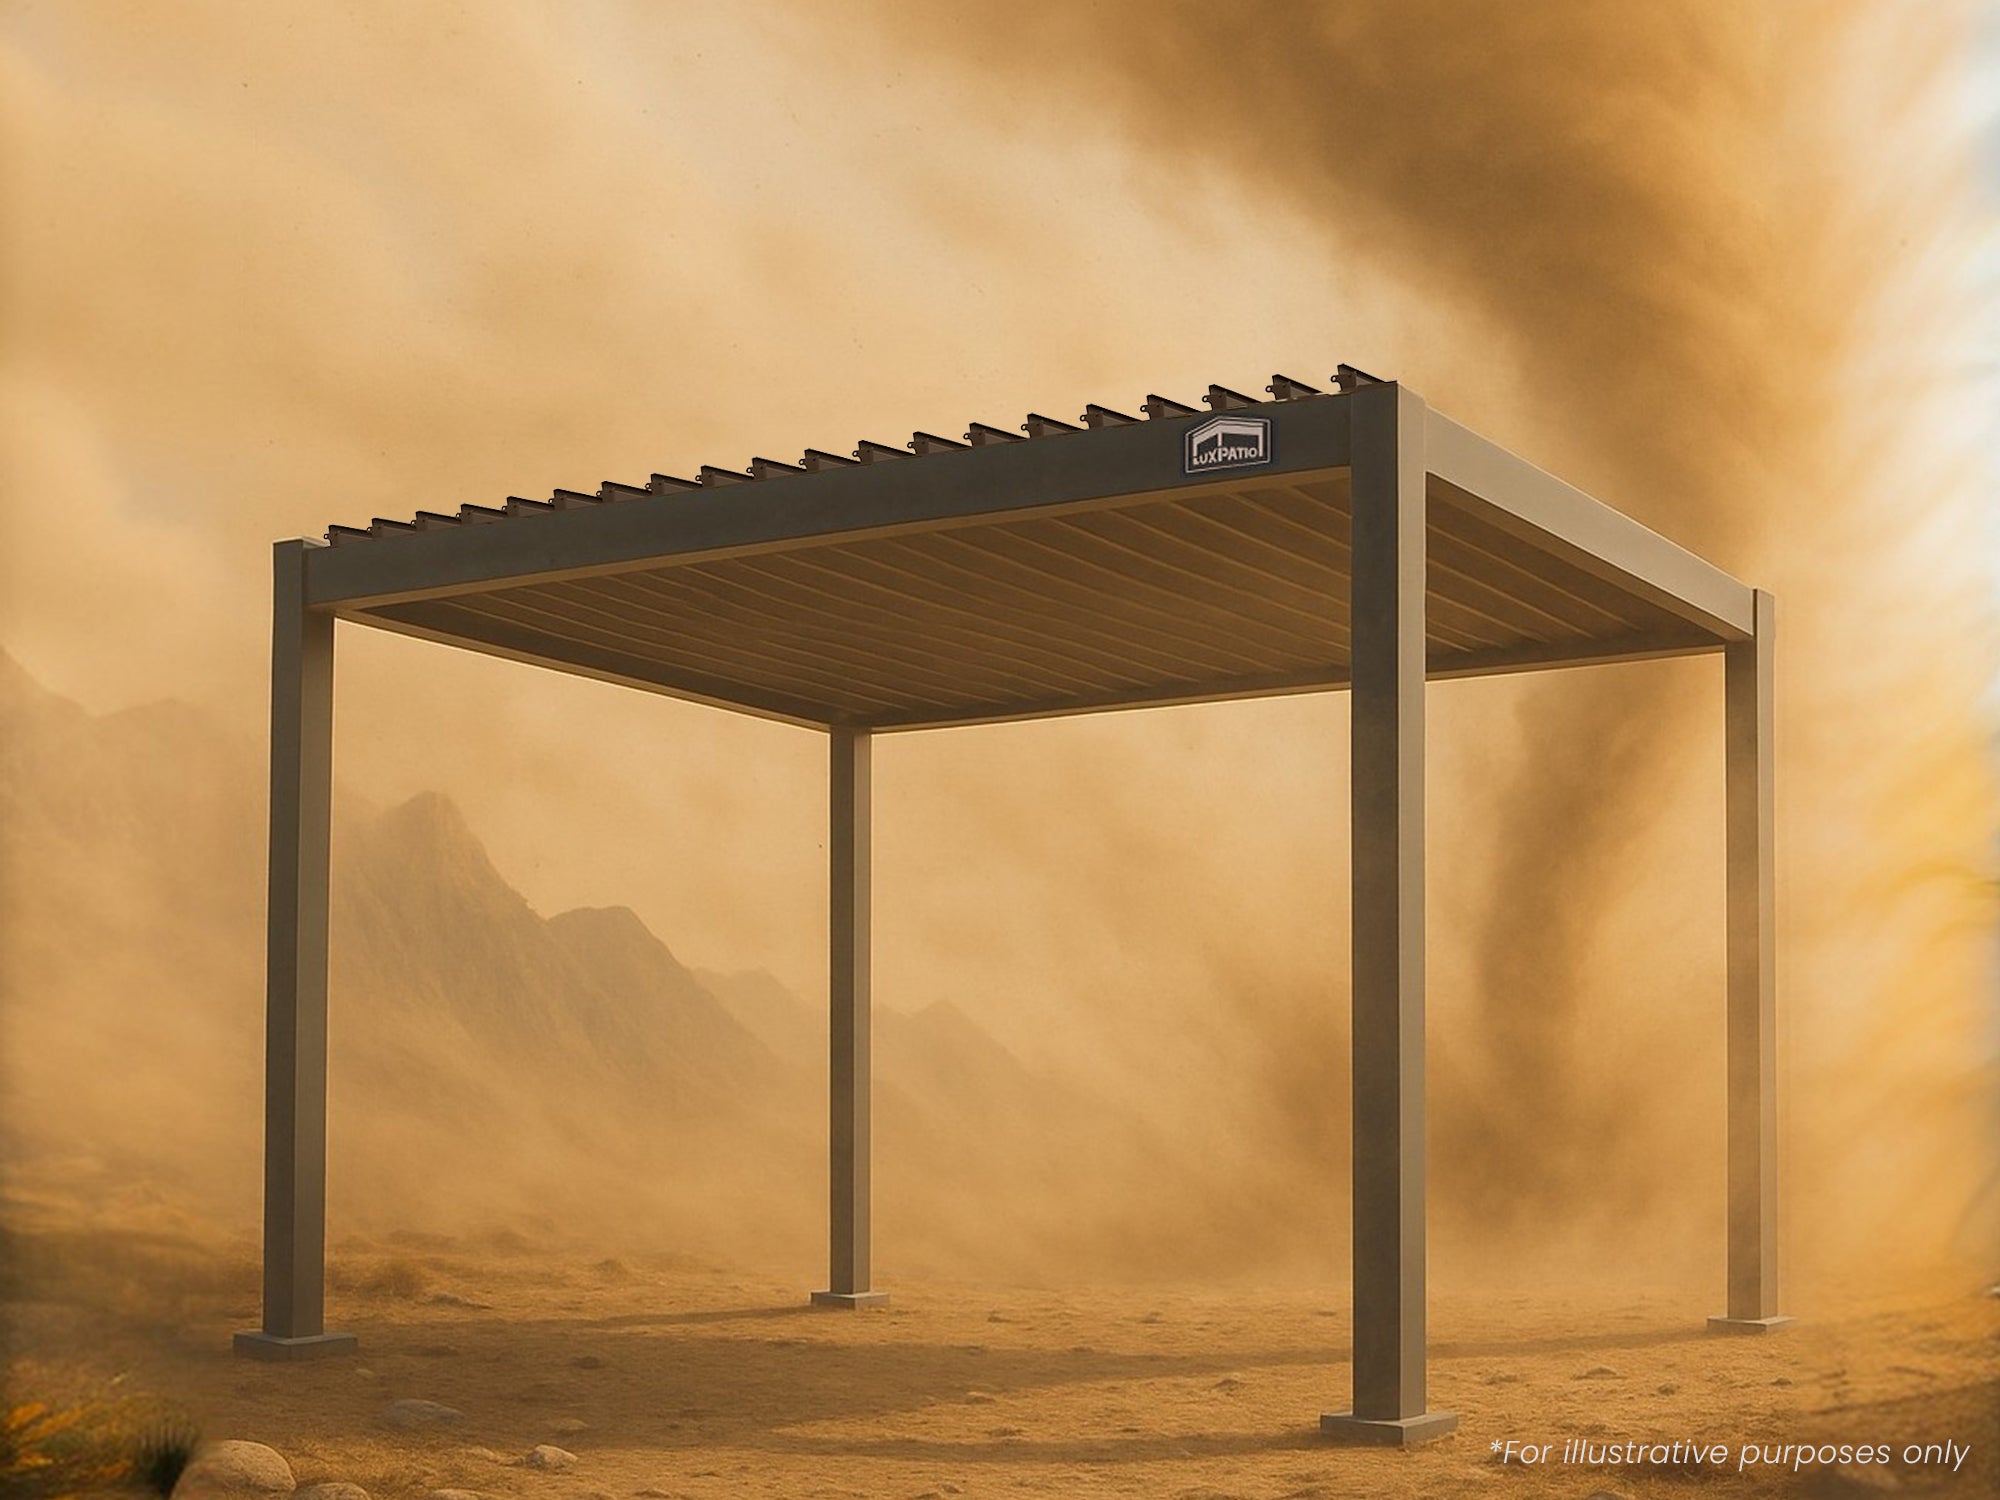
 Hurricane-Proof


 100-Day Risk-Free Trial

Couldn't load pickup availability
Features
Features
-
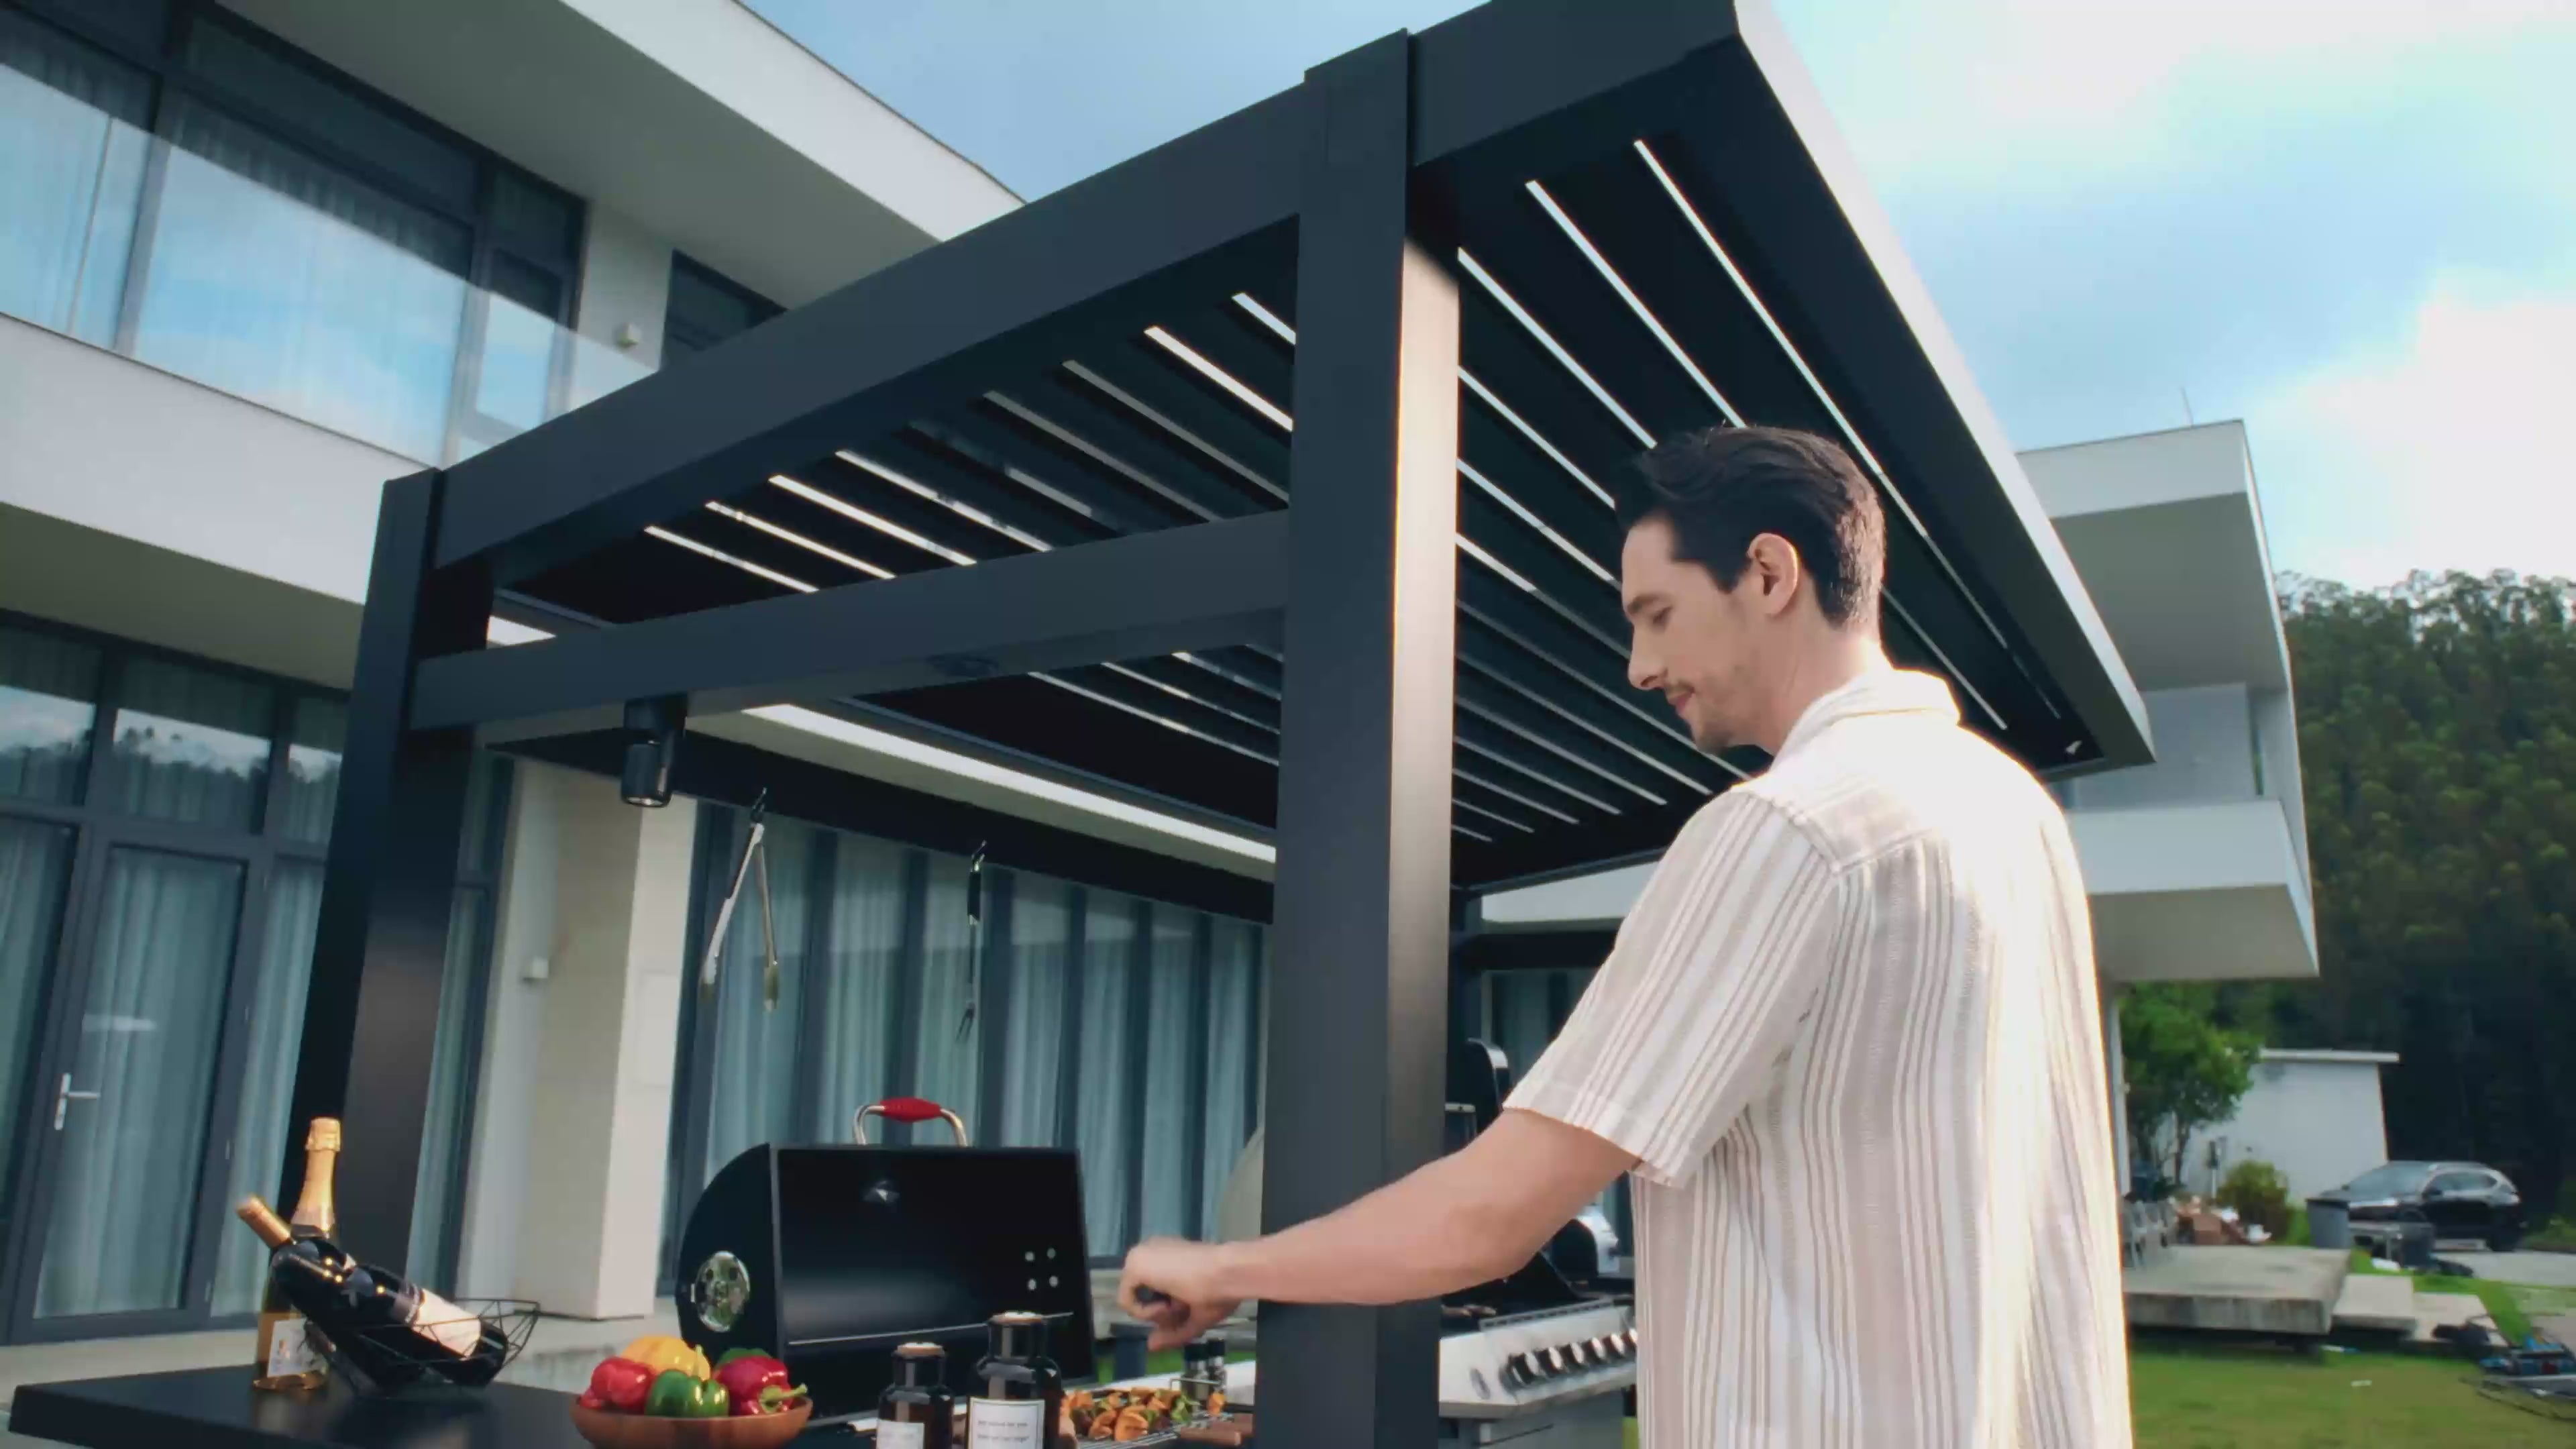
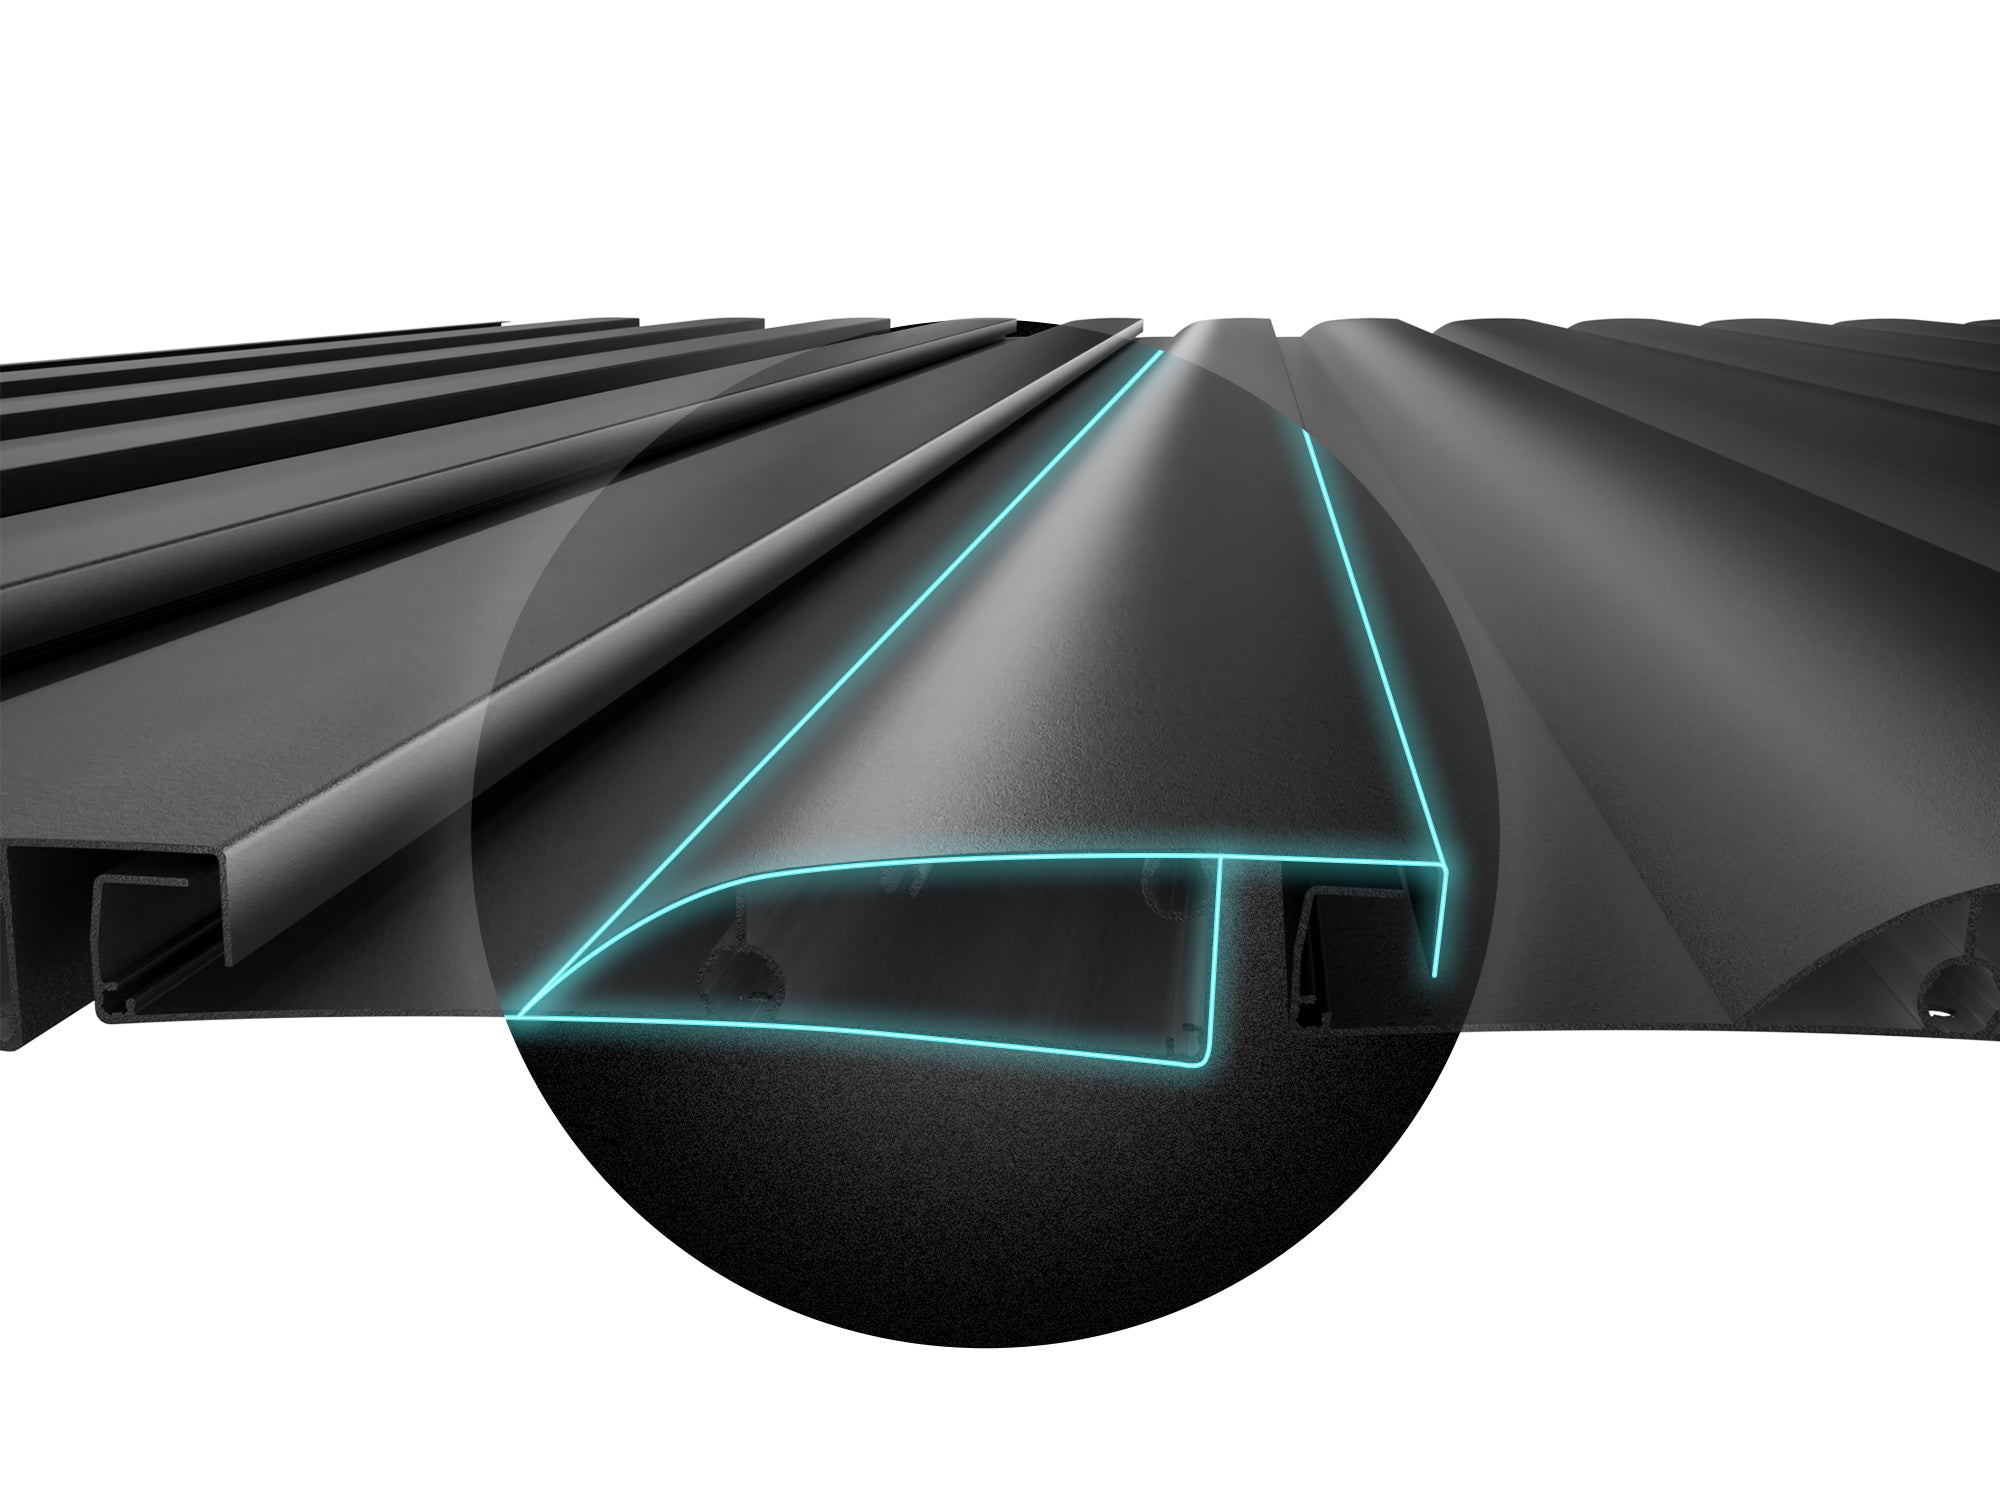
All-Aluminum Construction with AkzoNobel Interpon® Coating
Made entirely from 6063 T5 high-grade aluminum, the Pergola Pro's structure is corrosion-resistant, weather-tested, and built for year-round durability. The frame is finished with premium, eco-friendly AkzoNobel Interpon® powder coating for added resistance to fading and peeling. -
Adjustable Louvers for Light & Ventilation
Enjoy full control of your outdoor experience with louvers that tilt up to 90°. Open for airflow and sunlight, or close for shade and protection. Louvers are controlled by a smooth-turn hand crank. -
Built-In Drainage System & Water-Electric Separation
The NestGrill Pro features a concealed gutter system that channels rainwater through the beams and down the posts. Water and electric systems are separated, offering peace of mind in any weather. -
Sleek, Functional Design
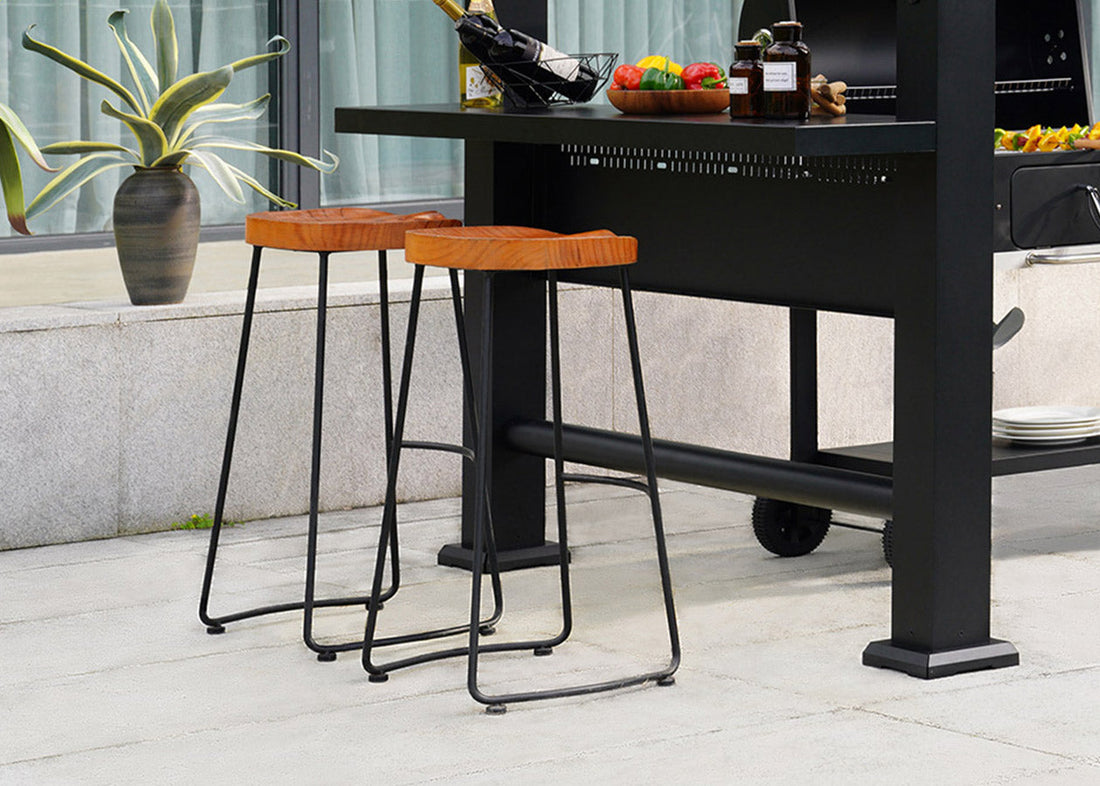
An integrated crank system offers seamless louver control while preserving a sleek, modern look. Dual-side countertops add extra space for food prep, drinks, or socializing—ideal for BBQs and outdoor entertaining. -
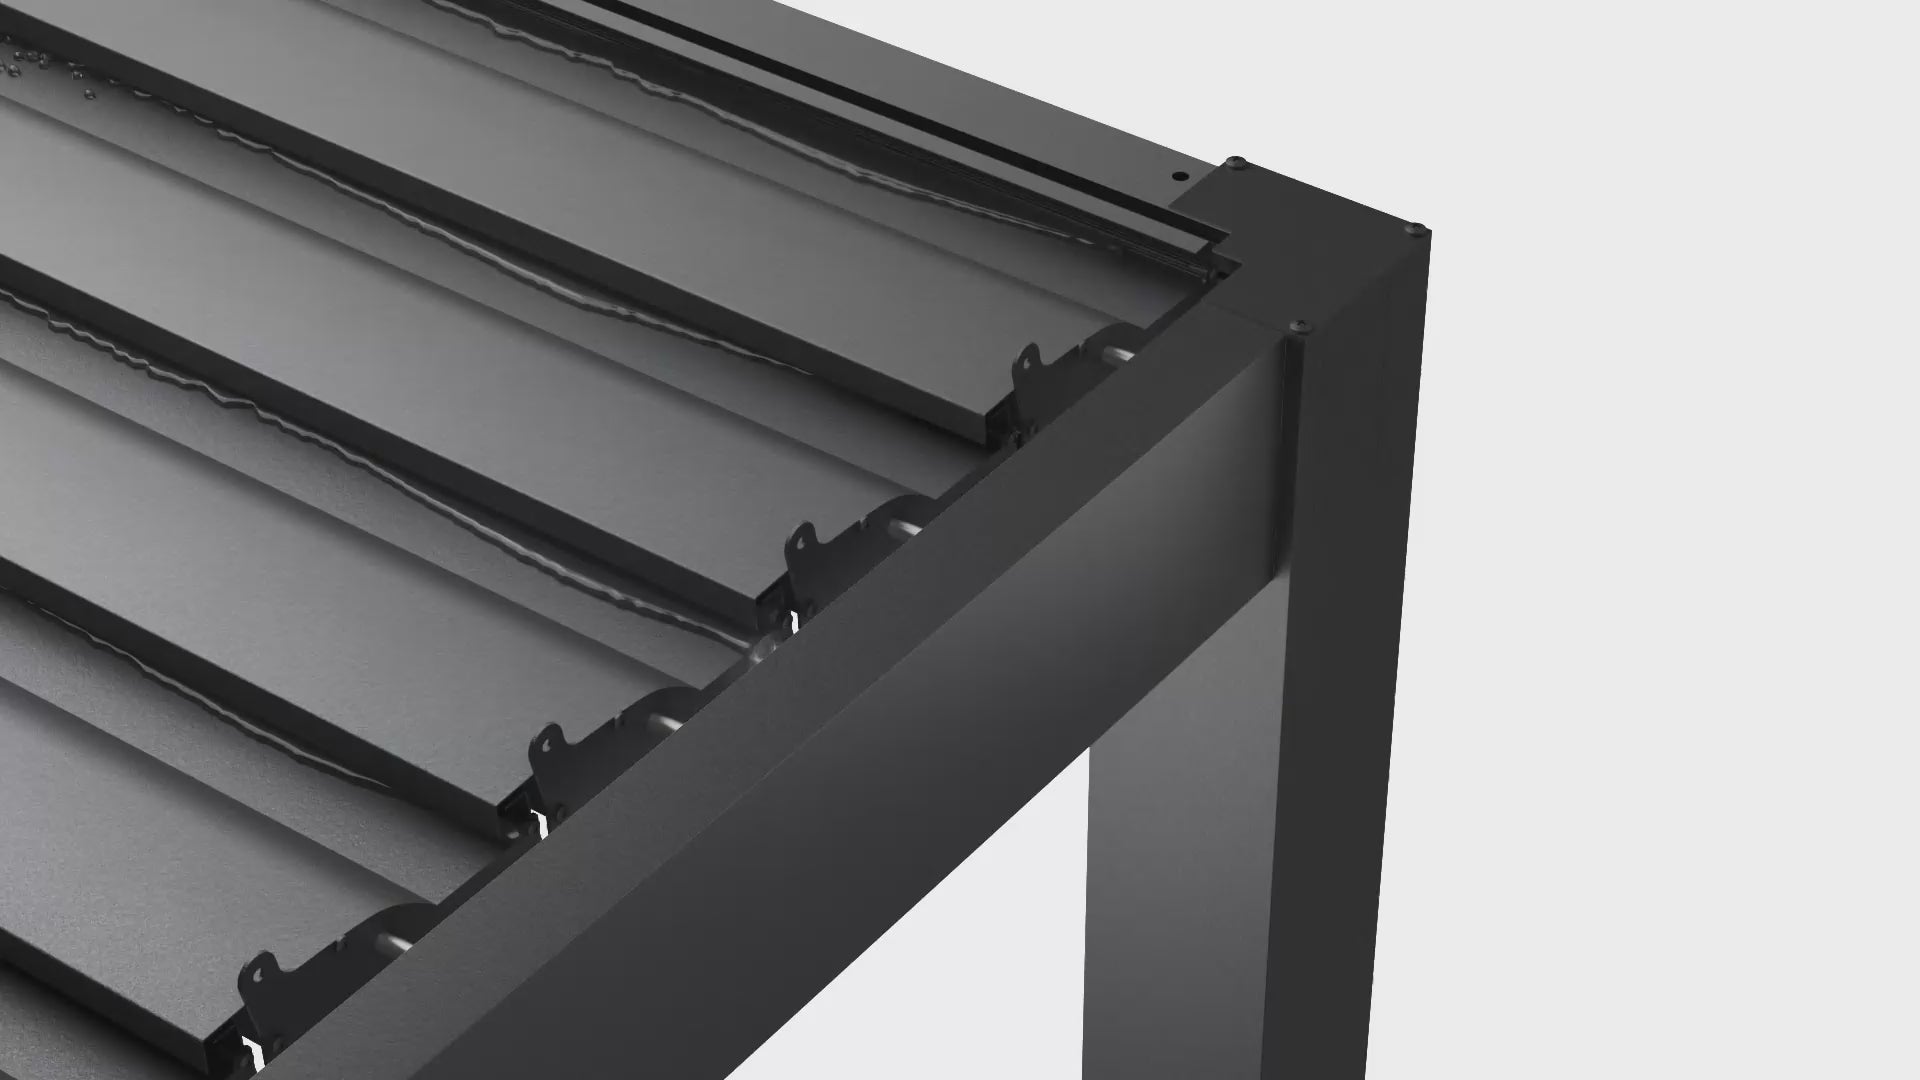
Quick Setup, No Hassle
Thanks to its innovative external connection structure, assembly typically takes 2–4 hours with two or more competent adults using standard power tools, though timing may vary. -
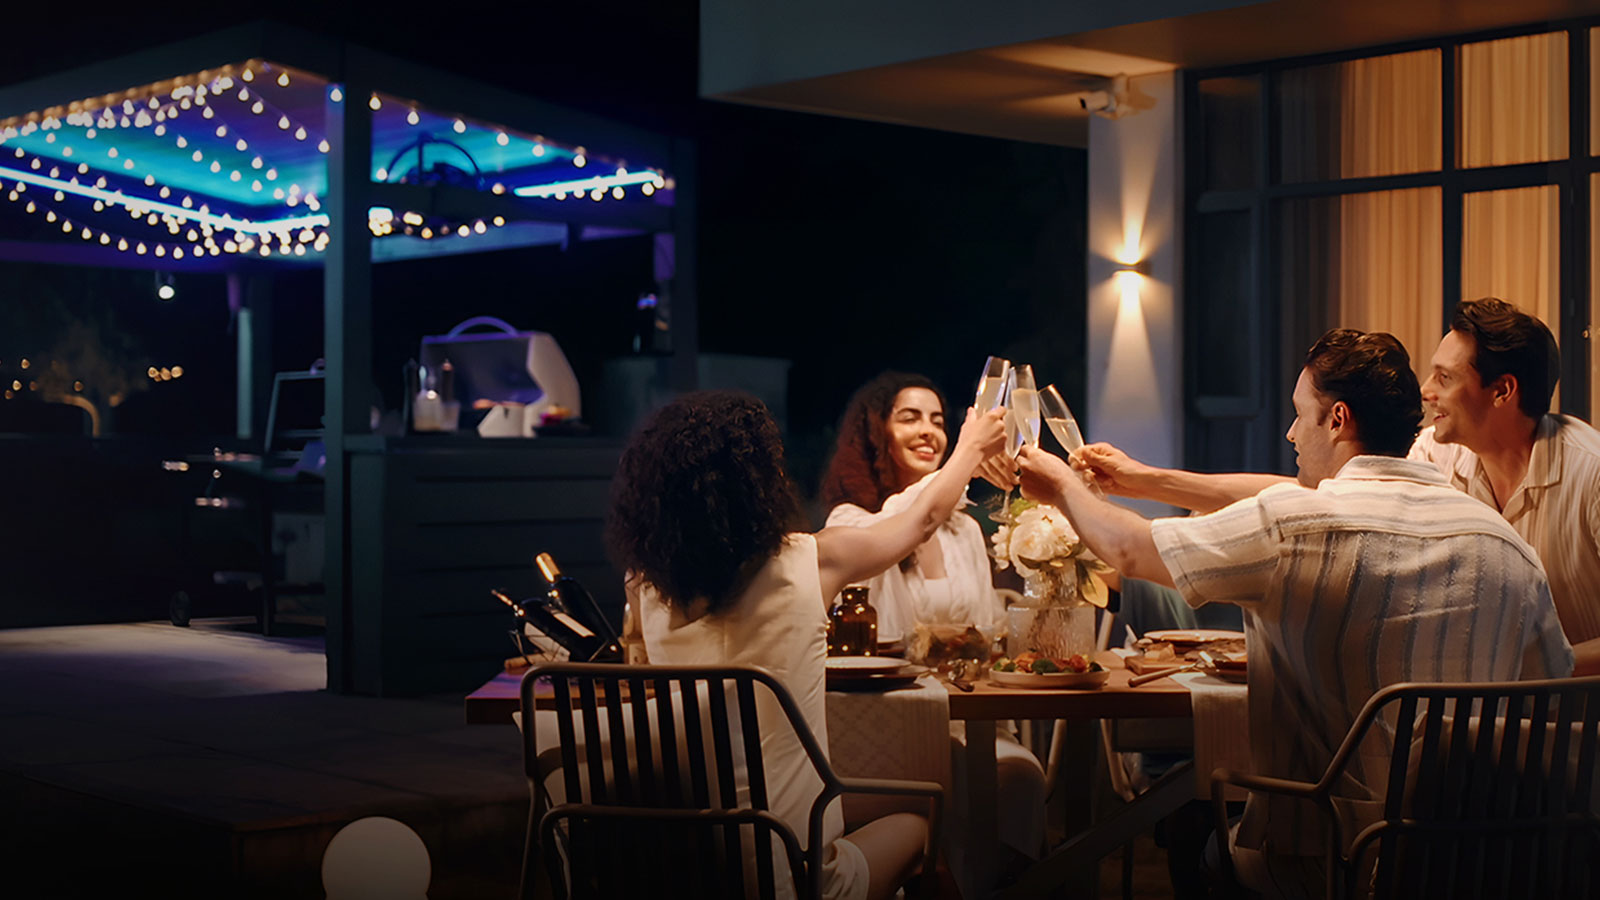
Set the Mood with an Integrated Lighting System
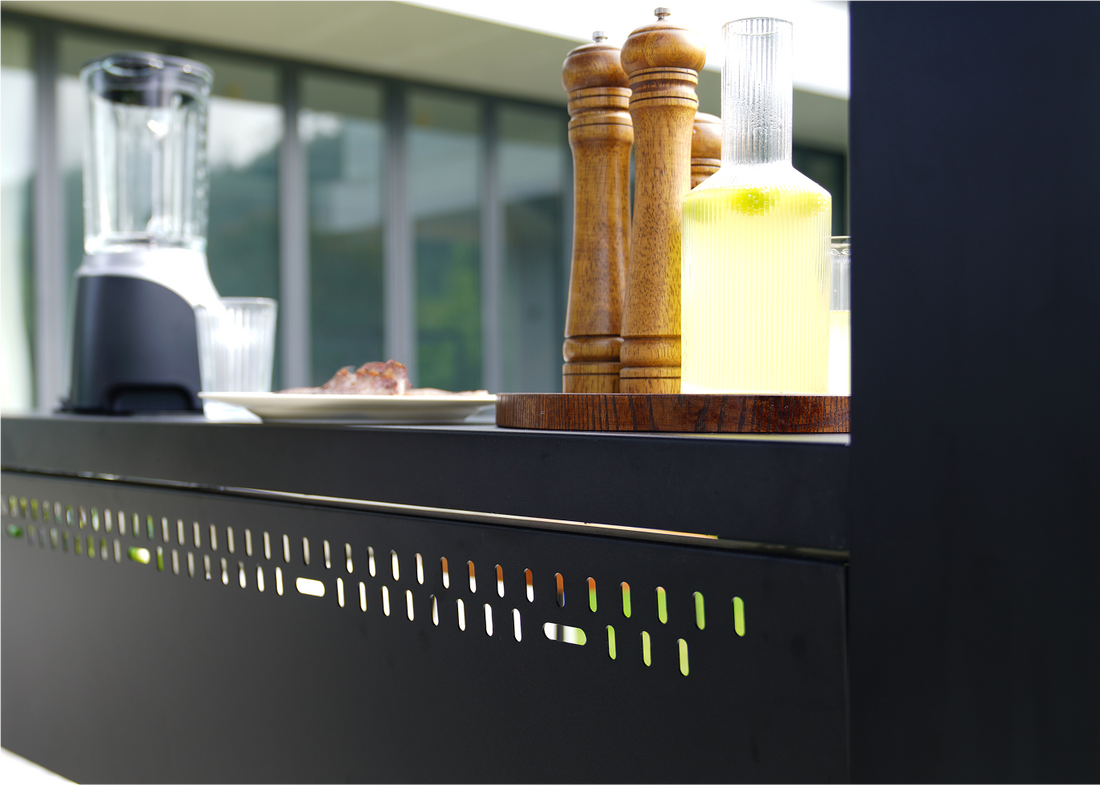
Comes with RGB LED lights with a 6-mode switch on the roof and side, creating the perfect atmosphere for nighttime gatherings. IP65-rated water-electric separation ensures that drainage and power systems operate safely, even in rainy conditions. -
Pegboard Storage System
Side-mounted pegboard panels let you hang grilling tools, lights, or décor using pre-drilled holes—everything is within easy reach.
Details
Details
Built to Last, Made for Outdoor Comfort. Transform your backyard into a functional, stylish retreat with this premium all-aluminum pergola. Made entirely from 6063 T5 high-grade aluminum, the pergola features a corrosion-resistant, weather-tested structure built for year-round durability. The frame is finished with a premium, eco-friendly AkzoNobel Interpon® powder coating for added resistance to fading and peeling.
Reinforced support posts deliver impressive strength, standing up to winds over 85 mph and snow depths of 20 inches. The roof features a 90° adjustable louver system, allowing you to control light and airflow for maximum comfort—manually via a discreet crank or remotely with an FCC-certified motor.
Stay dry even in the rain thanks to the 8° pitched roof and integrated drainage system, which channels water smoothly through built-in gutters and out through the posts. Decorative base covers add a clean, finished look.
For nighttime enjoyment, built-in lights turn your pergola into a cozy nighttime hub for dining, parties, or relaxing under the stars. A rear-post waterproof cover offers protection for optional power cords and outlets, allowing you to safely connect fans and grills or charge your devices. The IP65-rated water-electric separation keeps everything safe, even in rainy conditions.
Assembly
Assembly
N5_PRO_FOR_SOLO_GRILL_MANUAL-INS-250815-N5-ENG_MODEL-N5-ELITE
DownloadN5-PRO_FOR_MULTI_GRILL_MANUAL-INS-250815-N5-ENG_MODEL-N5-EPLUS
DownloadAvailable in multiple sizes, this pergola assembles in 2–4 hours with two or more competent adults. Whether you're hosting, relaxing, or cooking outdoors, it’s the perfect all-season centerpiece for your outdoor living.
Dimensions
Dimensions


Packaging & Delivery
Packaging & Delivery
We’re happy to provide free shipping on all NestGrill orders. Here’s what you can expect for your delivery:
- Fits Solo Grill: Your pergola will be shipped via FedEx and is expected to arrive within 7–15 days after dispatch.
- Fits Multi-Grill: This larger pergola requires truck delivery and is expected to arrive within 7–15 days after dispatch.
Our team will reach out to schedule a delivery time that suits you, and your LuxPatio boxes will be carefully delivered to your doorstep.
100-Day Risk-Free Trial
100-Day Risk-Free Trial
Try it at home. Love it, or send it back.
We believe your outdoor space should feel just right. With our 100-Day Risk-Free Trial, enjoy your LuxPatio pergola in real life before making it final.
- Set up & settle in – Build it, relax, and make memories
- 100 days to decide – Your trial starts 10 days after shipping
- Easy returns – Not the perfect fit? Just email us and we’ll be happy to help
- No hidden terms – All return shipping costs are on you, and we’ll guide you through it
Warranty
Warranty
A LuxPatio product is covered by a limited tiered-warranty:
- 10-Year Warranty: Applies to structural components like columns, base plates, and beams.
- 5-Year Warranty: Covers movable parts, including louvers, hand cranks, and mechanisms.
- 2-Year Warranty: Applies to accessories and electrical components.
What’s in the box
What’s in the box
Grill Pergola Pro - Fits Solo Grill (10 Boxes Total)
- Box 1: 90.35" x 9.45" x 8.86", 61.73 lbs - 3 crossbeams
- Box 2: 79.92" x 14.17" x 8.66", 50.71 lbs - 4 crossbeams
- Box 3: 94.88" x 10.83" x 5.31", 44.75 lbs - 2 posts
- Box 4: 88.19" x 11.81" x 6.5", 44.31 lbs - 2 posts
- Box 5: 84.45" x 5.71" x 7.28", 22.05 lbs - 2 louvers
- Box 6: 84.45" x 10.43" x 7.28", 35.27 lbs - 4 louvers
- Box 7: 84.45" x 10.43" x 7.28", 35.27 lbs - 4 louvers
- Box 8: 84.45" x 10.43" x 7.28", 35.27 lbs - 4 louvers
- Box 9: 75.39" x 17.72" x 7.28", 77.82 lbs - 2 countertops
- Box 10: 58.46" x 12.99" x 8.66", 37.48 lbs - Accessories
Grill Pergola Pro - Fits Multi-Grill (8 Boxes Total)
- Box 1: 142.91" x 9.45" x 8.46", 94.8 lbs - 3 crossbeams
- Box 2: 79.92" x 14.17" x 8.66", 50.71 lbs - 4 crossbeams
- Box 3: 94.88" x 10.83" x 5.31", 44.75 lbs - 2 posts
- Box 4: 88.19" x 11.81" x 6.5", 44.31 lbs - 2 posts
- Box 5: 140.55" x 16.34" x 8.46", 88.18 lbs - 7 louvers
- Box 6: 140.55" x 16.34" x 8.46", 88.18 lbs - 7 louvers
- Box 7: 75.39" x 17.72" x 7.28", 77.82 lbs - 2 countertops
- Box 8: 58.46" x 12.99" x 8.66", 37.48 lbs - Accessories
Adjust Your Shade, Effortlessly
Louvers open up to 90°, offering flexible control of sunlight and airflow.


Built to Impress

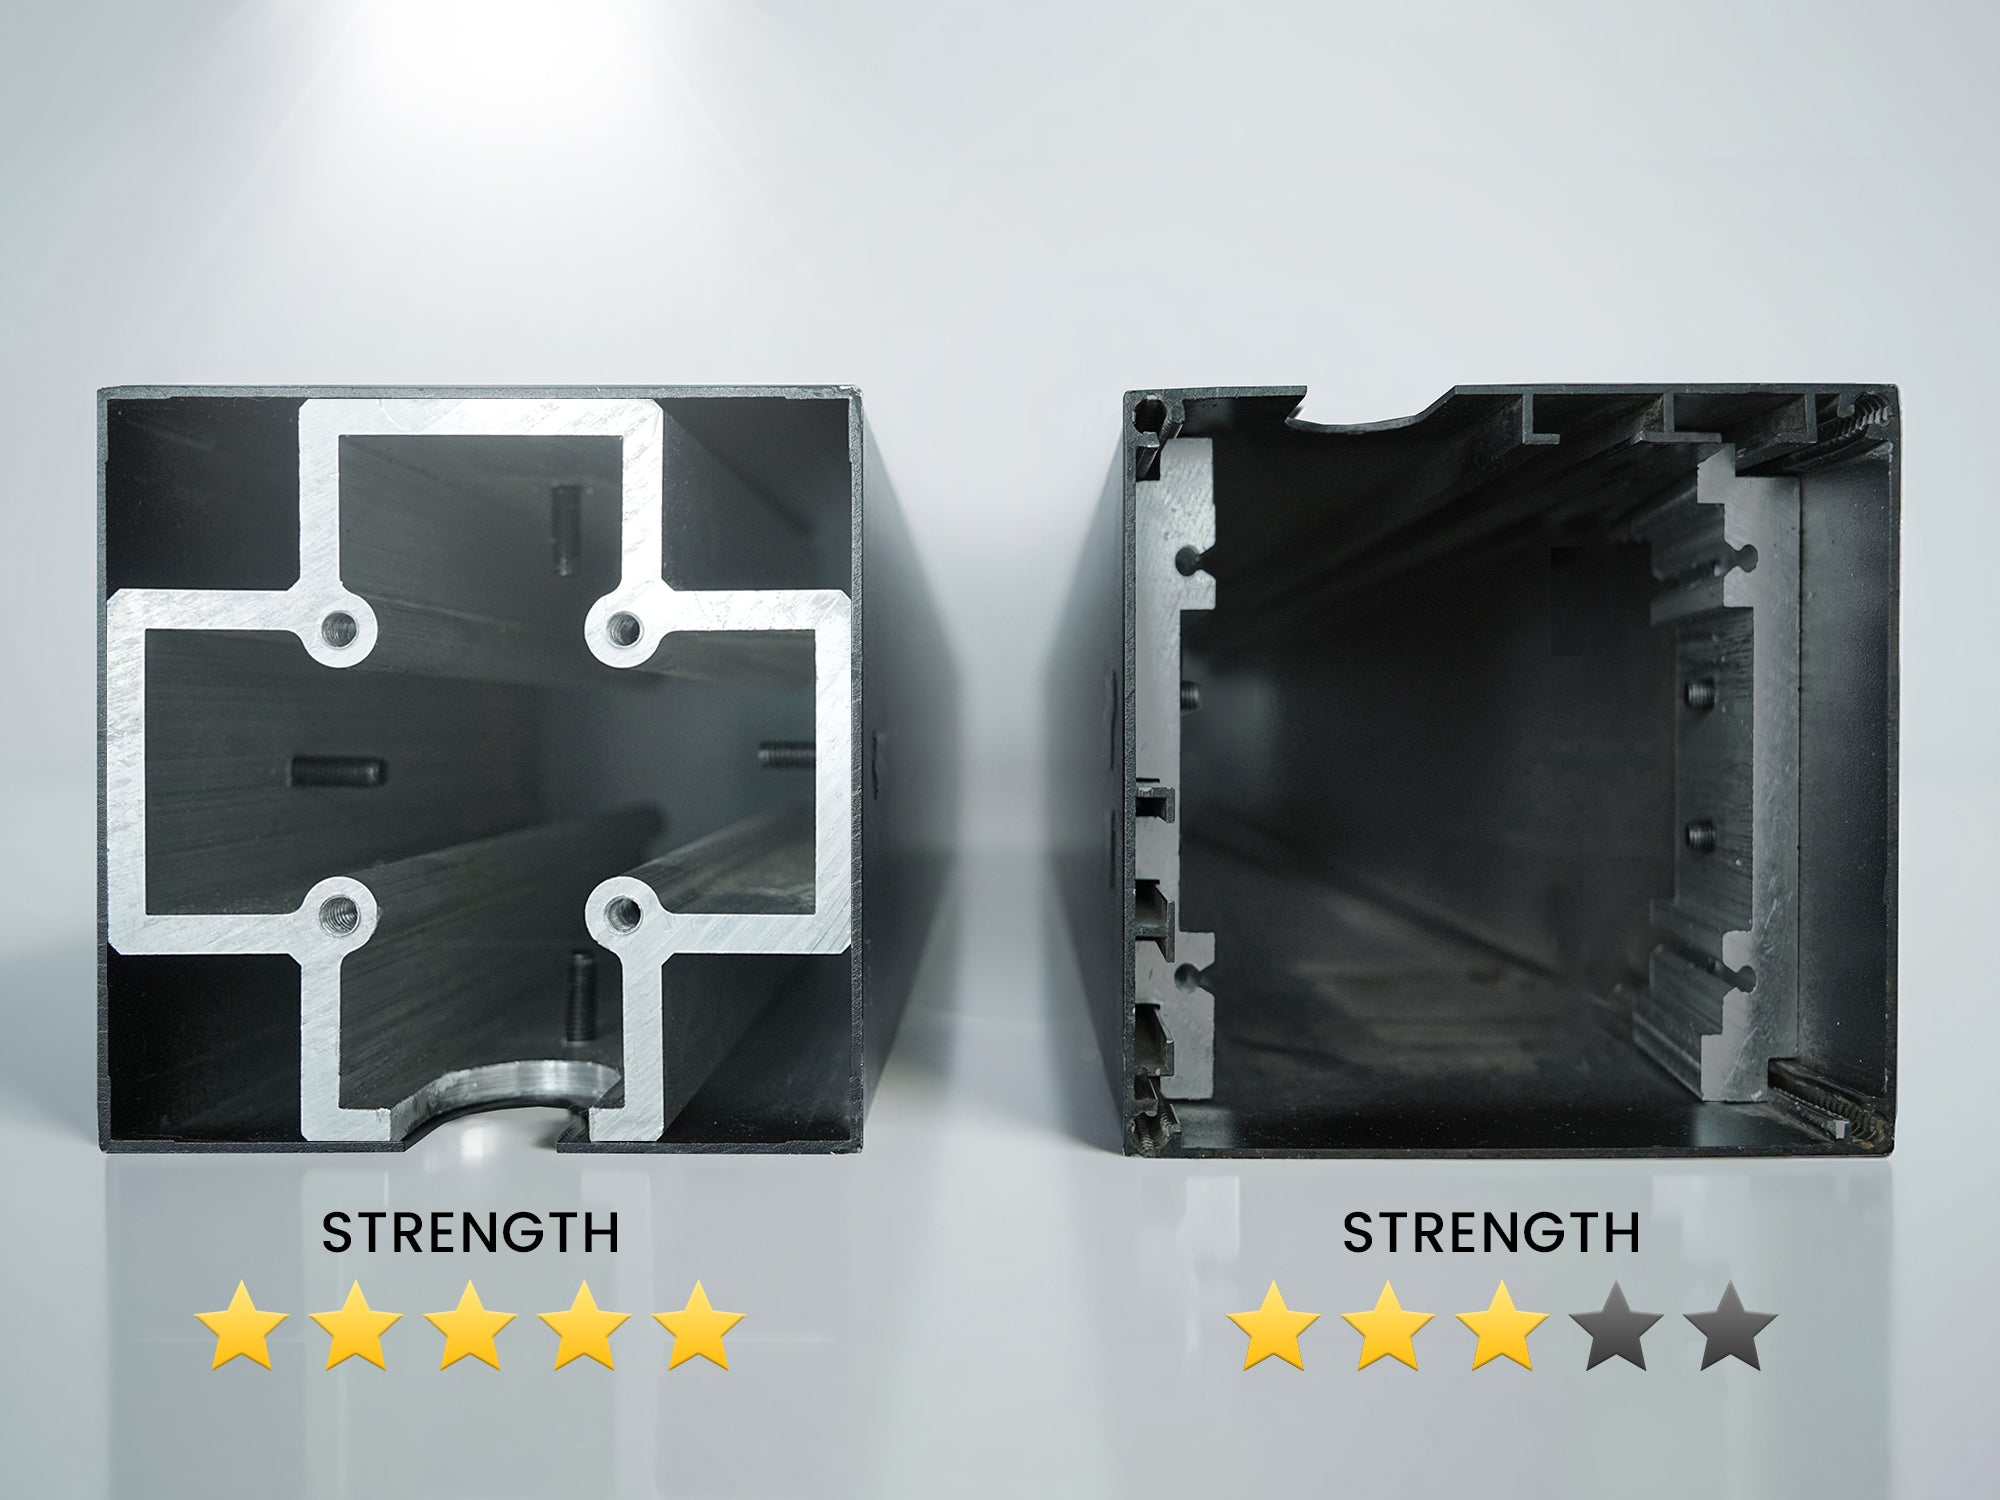
3x Stronger Than Ever
Crafted from 6063-T5 aluminum with a 20cm internal core, engineered to be 3x stronger for superior strength.
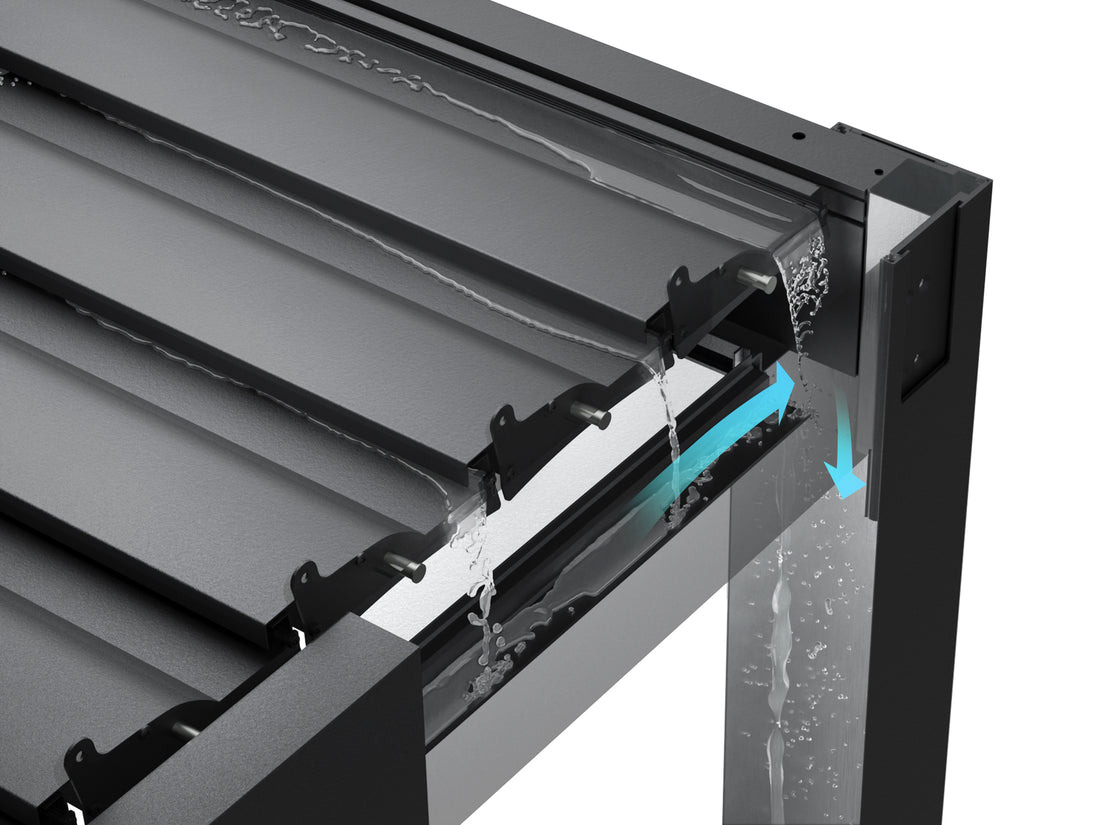
Built-In Drainage
All the water drains out of one post. Keeping you slip-free
Pre-Assembled for Easy Setup
We pre-assembled all the louvers and lighting, and with 50% fewer screws than others, setup is faster and easier than ever.
Eco-Friendly, World-Class Coating
We use AkzoNobel Interpon® powder coating for superior fade, rust, and corrosion resistance.
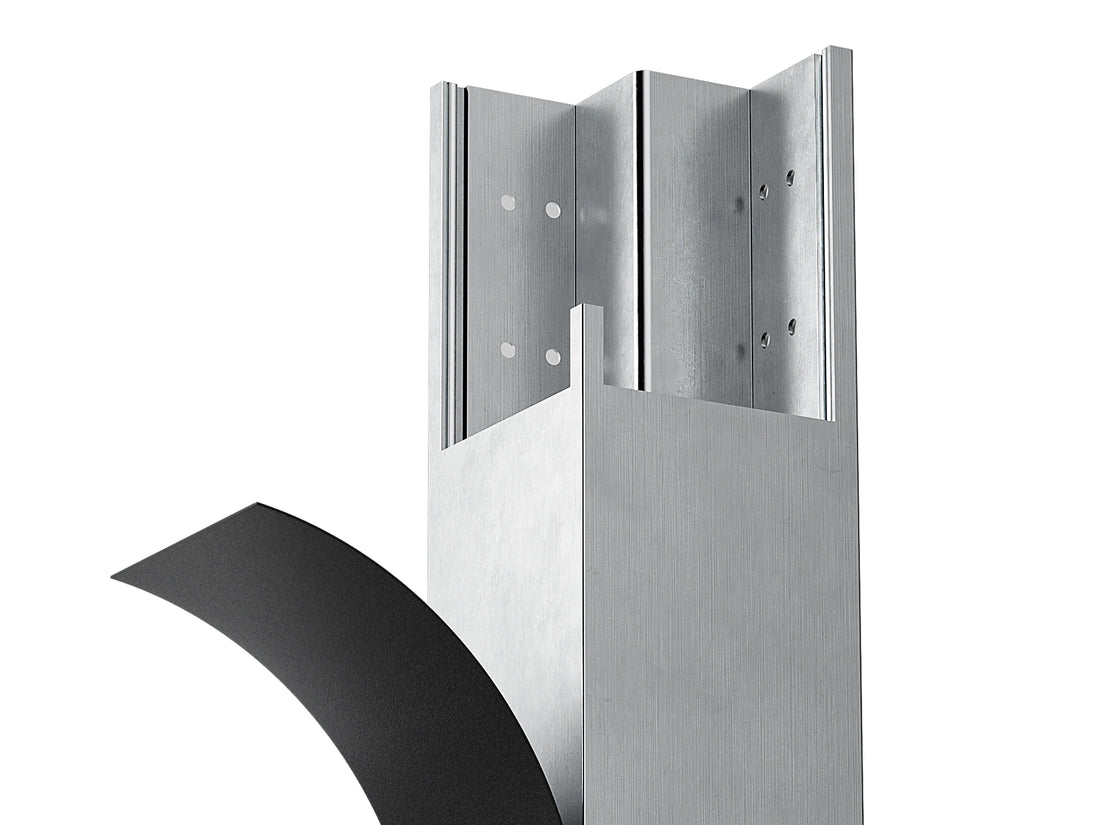
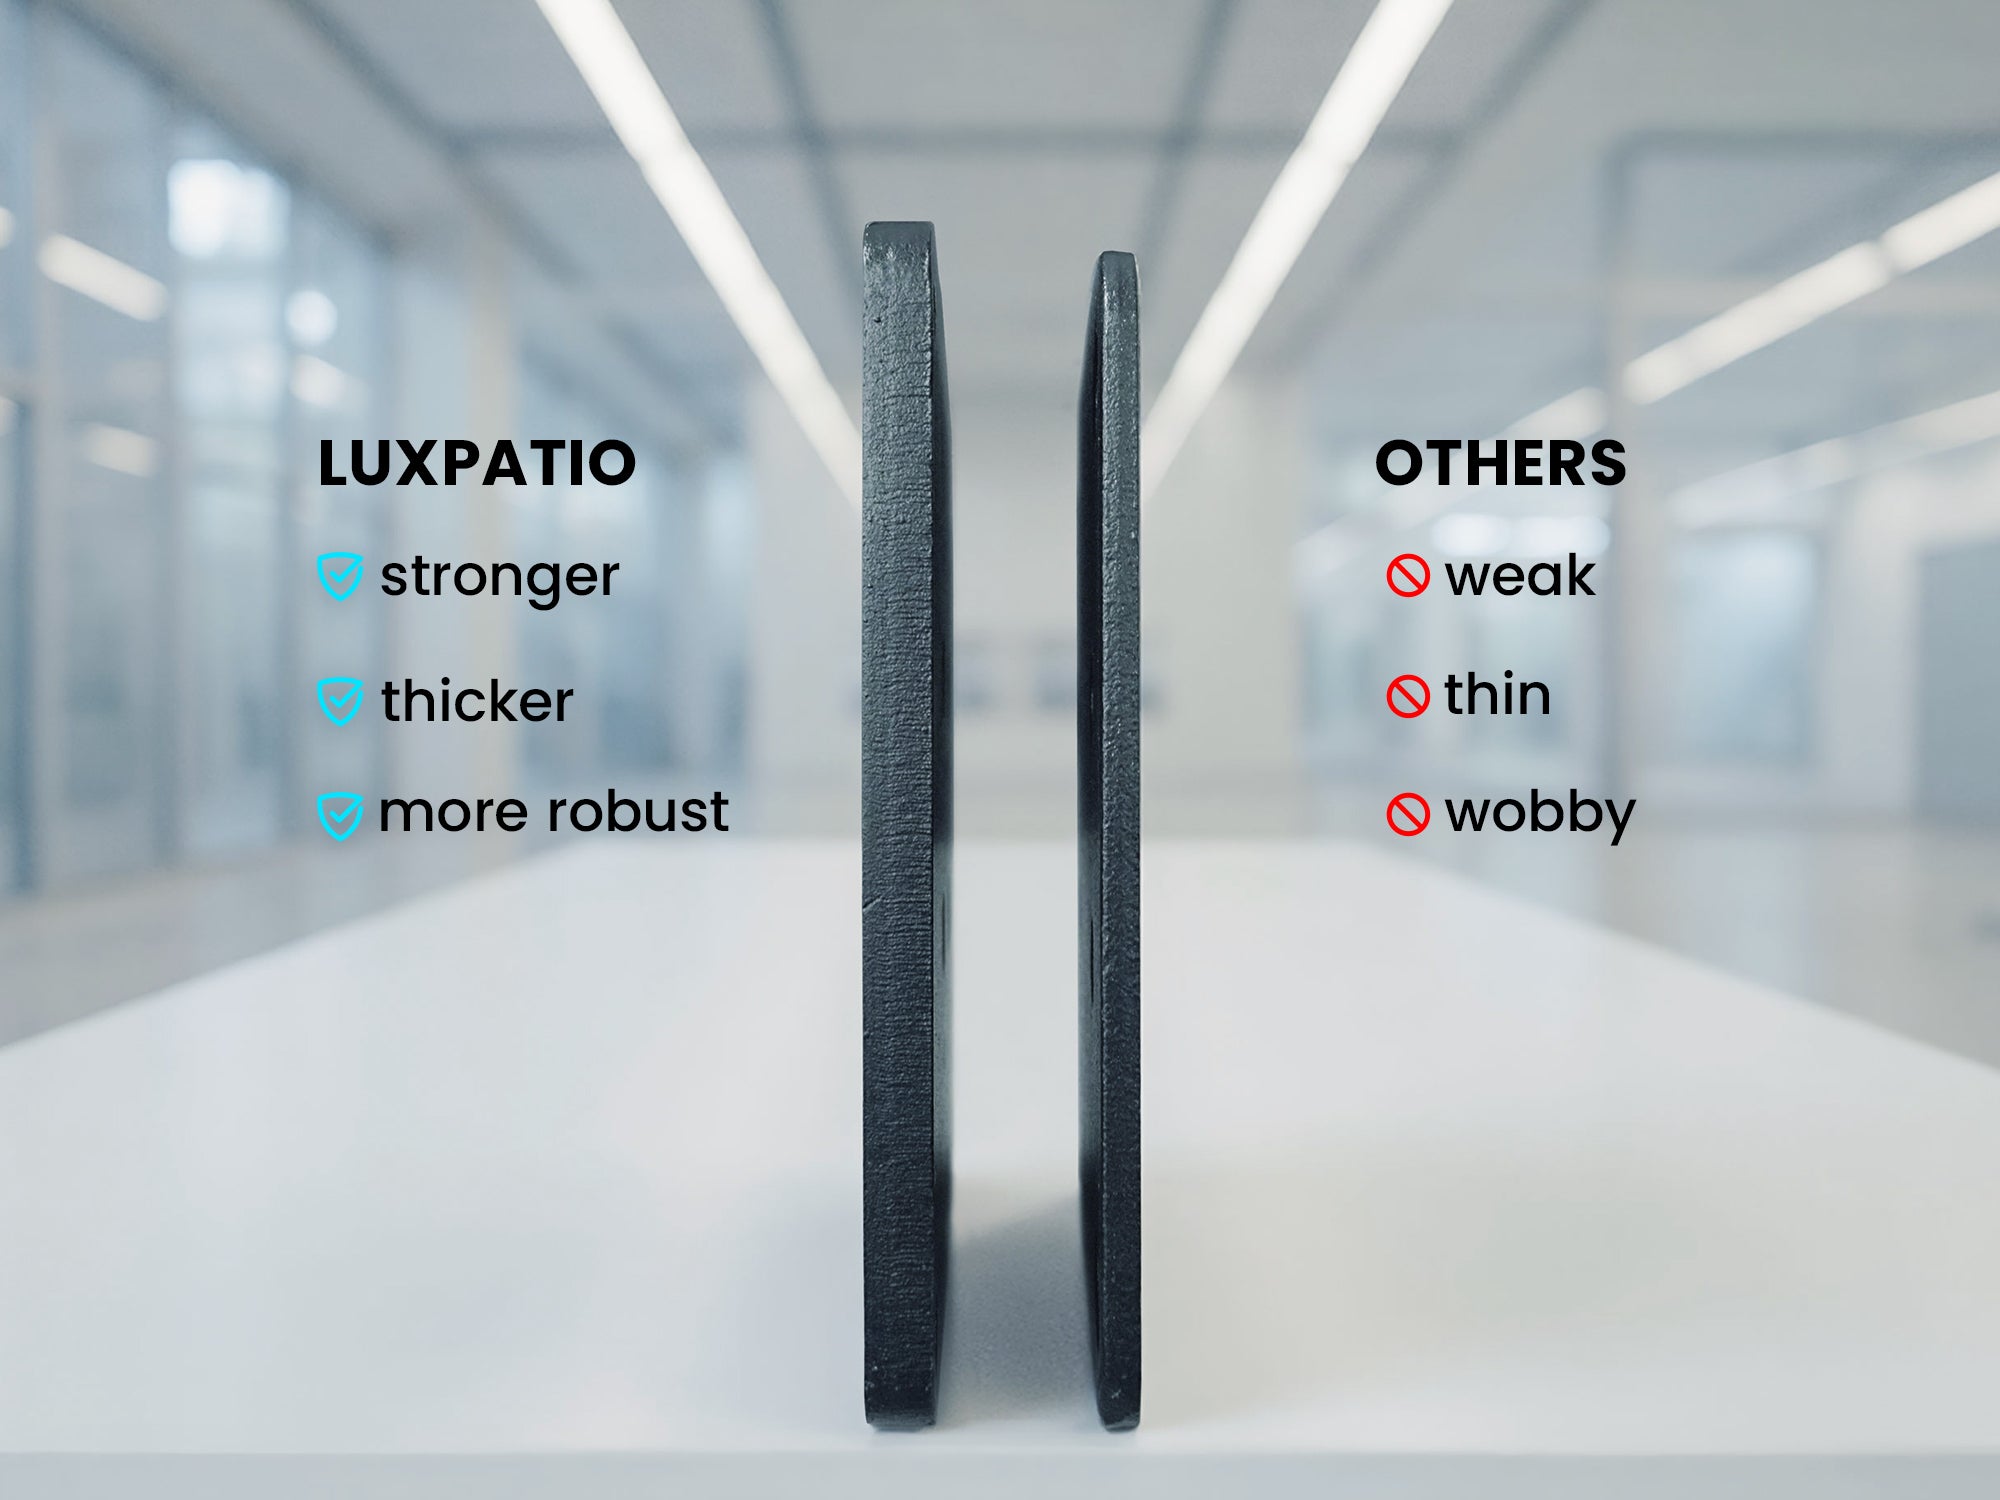
Unshakable Strength

Ultra-Sturdy Pillar= Greater Load-Bearing

Thicker Baseplate. Stronger Foundation

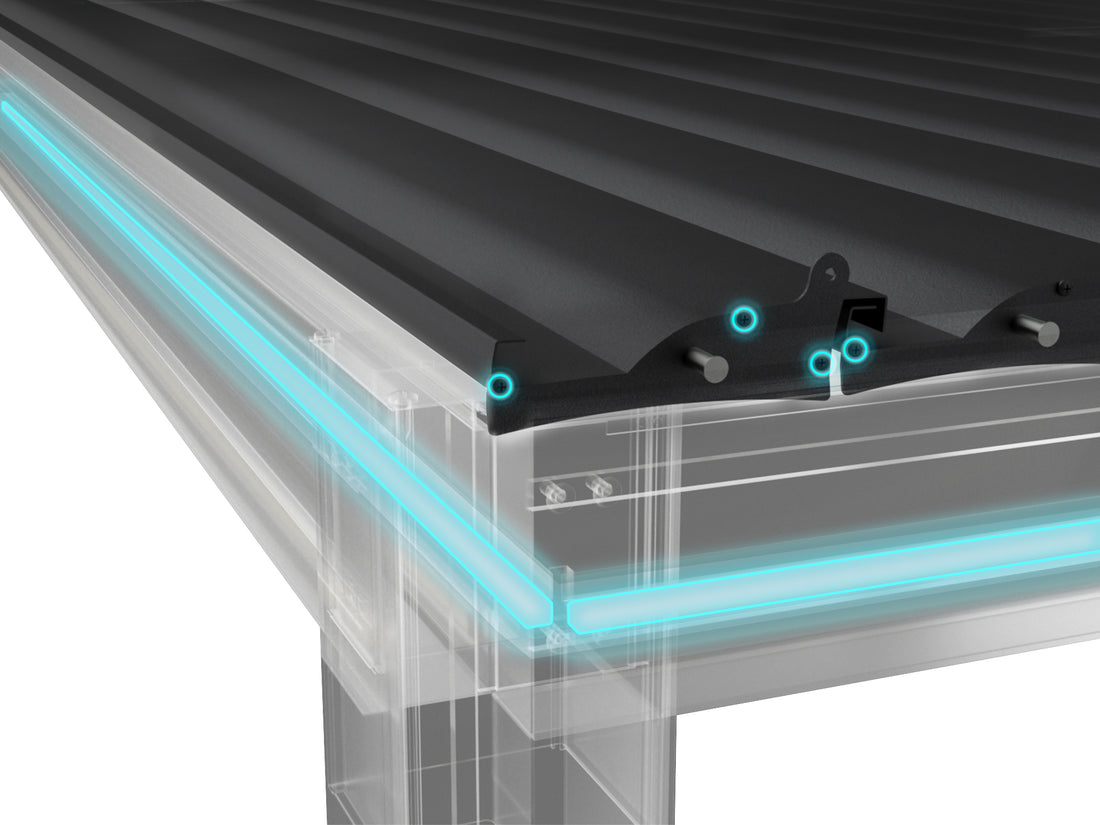
Double-Layer Louvers. Better Protection

Premium 6063-T5 Aluminum. Built to Endure
We Reinvented the Pillar Inside and Out
Our custom Ultra-Sturdy Structure reinforced thickness and structure, delivering superior stability where ordinary square posts fall short.
We Made the Base Thicker On Purpose
Most baseplates settle for “good enough.” We designed ours to be better—thicker, tougher, and built with purpose.
Double-Layer Louvers, Because One Isn’t Enough
We added a second layer to our louvers for better durability, stronger wind resistance, and enhanced protection. Every layer serves a purpose—nothing extra, nothing wasted.
Built To Withstand Any Weather
From heavy snow to strong winds, we designed every part of this pergola to endure. Reinforced structures and thoughtful engineering ensure it stays firm when the weather turns harsh.

Rain Has One Way Out. It’s by Design
Because water shouldn’t stick around. We’ve designed a clear path for rain to exit — efficiently, invisibly, through a single post. No puddles. No mess. Just a clean getaway.
Eco-Friendly World-Class Coating
AkzoNobel, founded in 1963, is a Fortune 500 company selling in 150+ countries and ranks top three globally in its industry.


Smart Connections. More Pre-assembled. Less Screws.
A premium pergola shouldn’t come with a complicated assembly. All to save you time and effort, so you can enjoy your outdoor space sooner.

Easy-to-align external connections
Pre-assembled louvers and lighting
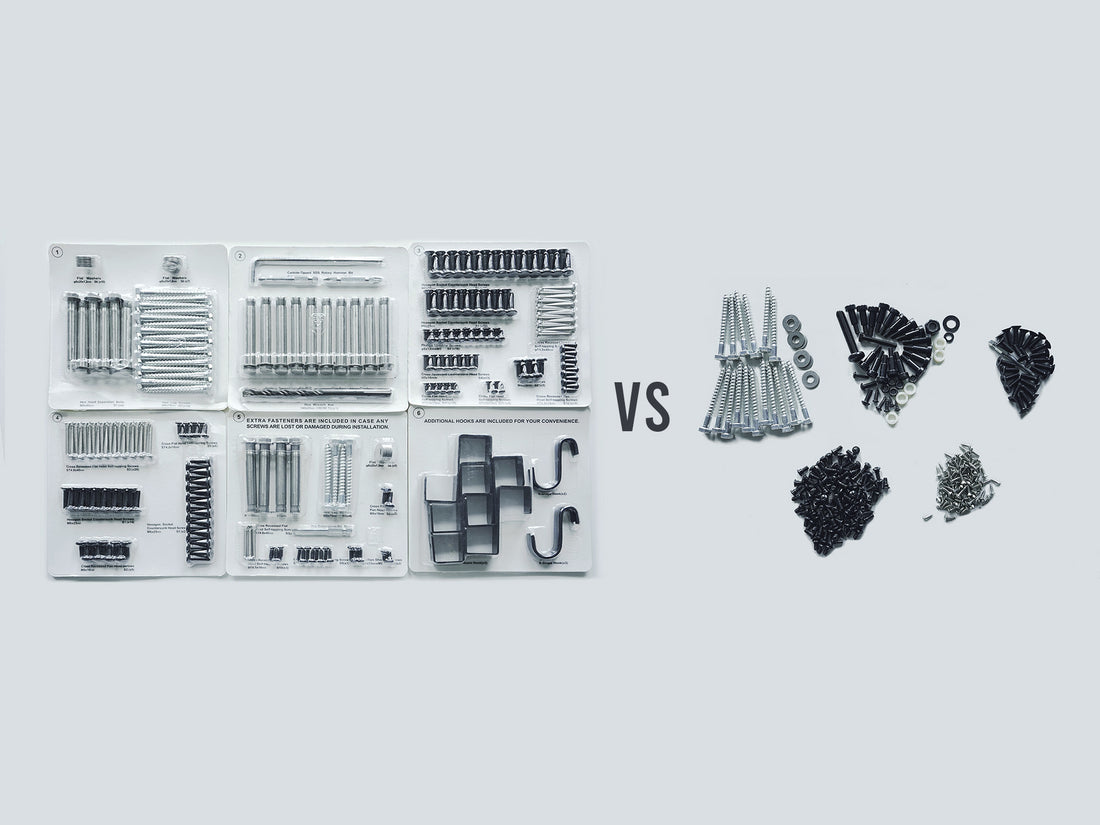
50% fewer screws than others, in a well-organized package.
There’s More to Love
DIY pegboard
Paired with customizable pegboard panels, your tools, seasonings, and cookware stay organized and within reach.
Dual-side countertops
Dual-side countertops with comfortable footrests offer the ideal setup for casual drinks, quick bites, or prepping meals outdoors.
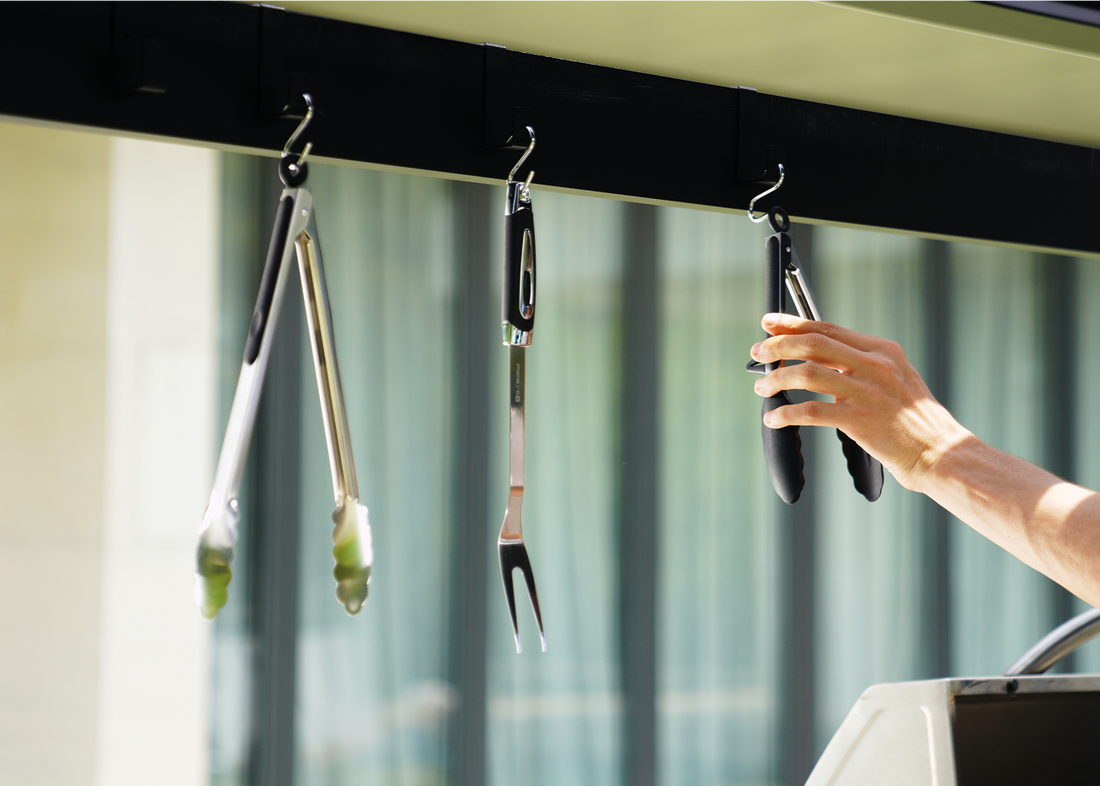
Easy-to-attach hooks
Hooks are a smart way to keep your kitchenware organized and quickly find what you need. It's easy to attach; no tools are needed.
Install in 2-4 Hours, Enjoy for Years
Thanks to its innovative external connection design, fewer screws are required for assembly. With standard power tools, two or more competent adults can assemble the pergola in just 2–4 hours, though timing may vary.

Step 1: Prepare the Foundation
Ensure the installation area is level and stable. Suitable foundations include concrete, pavers, or wood/composite decking—with concrete being the preferred option for maximum stability.

Step 2: Attach the Base Plates
Secure each base plate to a vertical post using four screws.

Step 3: Assemble the Frame & Connect Power
Connect the posts to the upper and lower beams using the fixed components. Connect the power cord. With 2–3 people, raise the structure into position. Assistance is recommended due to the size and weight of the components.

Step 4: Pre-Drill Anchor Points
Measure and mark the anchor locations based on the base plates. Then pre-drill holes to prepare the surface for secure anchoring.

Step 5: Anchor & Final Touches
Anchor the pergola to the ground as specified. Install the hand crank, base covers, and power board cover. Tighten all bolts and ensure the structure is stable.

Step 6: Attach the Louvers
Secure the louvers to the beams to complete the roof coverage.
Certification


FAQs
Which NestGrill Model is for me?
Which NestGrill Model is for me?
NestGrill comes in two models: NestGrill Lite, a compact and practical option for casual grilling, and NestGrill Pro, a feature-packed version with built-in lighting and bar tables—perfect for those who treat outdoor cooking as a full experience. Both are built with the same durable materials, so the choice depends on how much space and functionality you want.
Compare NestGrill Models:

How long will it last?
How long will it last?
NestGrill is built to last up to 30 years with almost no maintenance. It’s made from premium 6063 T5 aluminum—lightweight, rust-resistant, and exceptionally durable. The frame is finished with AkzoNobel Interpon® powder coating, adding long-term protection and style. Unlike wood, it won’t warp, rot, or require constant care. Easy to clean and eco-friendly, NestGrill is made to look great season after season, even in tough weather.
What are the wind and snow load limits for the NestGrill Pro?
What are the wind and snow load limits for the NestGrill Pro?
NestGrill Pro is built to handle serious weather. With reinforced posts at the base, it stands strong against winds over 85 mph (hurricane-level) and supports over 20 inches of snow with ease. Whether it’s a breezy evening or a snowy day, your grilling plans are covered—literally.
How does the NestGrill Pro handle rain?
How does the NestGrill Pro handle rain?
Rainy day? No worries. NestGrill Pro features an 8° sloped roof and a smart Rain Management System that guides water from the top into built-in gutters, then channels it down through the back posts—keeping you and your grill dry while the rain flows away effortlessly.

Is it easy to self-assemble?
Is it easy to self-assemble?
Yes, and we’ve made it easier than ever. NestGrill Pro uses a smart external connection design, so there’s plenty of room to work with power tools comfortably. Unlike other products on the market, our extra beam system slides in smoothly, making the structure stronger and the setup faster. With two or more competent adults, you can have it ready to enjoy in just 2–4 hours.
What should I do if the pergola arrives damaged or missing parts?
What should I do if the pergola arrives damaged or missing parts?
We're sorry for the trouble! If your pergola arrives damaged or with missing parts, please contact us at support@luxpatio.com or call 877-770-0567. We'll take care of it ASAP.
What accessories do you offer?
What accessories do you offer?
We offer 3 optional accessories for your pergola:
- Outdoor Grill Metal Fan: Helps with ventilation while grilling and can be installed where you prefer.
- Aluminum Cabinet: Great for storing BBQ tools; you can choose one or two to fit your needs.
- Aluminum Slats Wall: Adds privacy and blocks sunlight with adjustable angles.
Does this pergola require a permit?
Does this pergola require a permit?
Permit requirements can vary depending on your location. That said, most of our customers do not need a permit to install their pergola. We recommend checking with your local building department or HOA to ensure your setup complies with any applicable codes, regulations, or community guidelines.